Creating Restaurants
Reading
Implement "Add"
Let's turn our attention to the NewRestaurant component and how we will use
the endpoint POST /api/Restaurants to create a new restaurant.
Make the NewRestaurant the component we render in the App.
Change the App component to render the NewRestaurant component for now. Once
we get these two pages working, we'll add in react-router to be able to switch
between them.
Track state for each input field
For each input field, we will need to track the data in the input form. Since
there are fields for Name, Description, Address, and Telephone we will
need a state for all of these.
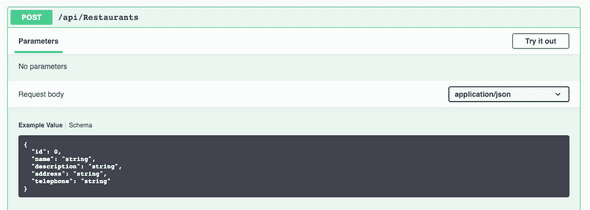
Typically we would create separate state variables for each of the input fields. However, all of these are related to a restaurant. Let's look at the JSON we need to send for creating a new restaurant:
We won't be sending the id field since the database will take care of that,
but the rest of the attributes are what we want to generate. This indicates that
we could use a single state variable that was an object with this shape. That
is:
If we can update this state with the values from the input fields, then we could
just POST this object to the API.
We will change each <input> and textarea to include a value= property and
an onChange property:
We set the value to the part of the object corresponding to the name of the object we are building. We also set a unique method to handle input/textarea changes.
Let's implement one of the handling methods, handleAddress:
Here we get the new text for the address from the value attribute of the
changed element. Then we construct a new object by first taking the existing
object and spreading it. This approach takes each key/value pair and makes it
a key/value pair in the object we are creating. In essence, this "copies" the
values to the new object. Then we add in the address field with its new value.
Adding the new value afterward, we override any address key/value pair
already spread into the new object. In the end, we have a copy of the
existing newRestaurant object but with a new value for the address
This pattern will repeat for the other form fields:
However, if you notice, we added a field name to each of the inputs that have
the field's name. We were careful to name these after the object's properties.
Thus we can use this to create a single handle method that is reusable
amongst all the onChange events for string based state:
NOTE: If we have an integer state, we would need an equivalent
handleIntegerFieldChangemethod.
Finally, let's handle the case of submitting the form. Instead of adding an
onClick method to the button, we will add an onSubmit for the <form>. This
event handles all the ways a form may be submitted (e.g., pressing enter in an
input field)
The implementation of handleFormSubmit will use a react-query mutation to
create the new restaurant.
First, setup a method to submit the new restaurant. Since this method will receive the restaurant to create it can exist outside of the component definition
Then we can setup the mutation
Finally, our form submit handler becomes:
Time to add some React Router
NOTE: If you do not have React Router installed in your template, you will need to do this step first:
In your ClientApp directory:
It is now time to start to route our pages. We'd like the Restaurants page to
be at our home path of / and the NewRestaurant page to be at a path of
/new. Then when we add a restaurant, we will redirect the user back to the
home page.
If you need to update main.tsx
First, we will set up the routes in our App.
In the App component, let us update the button in the header to be a correct
link.
Returning to our NewRestaurant component, we can now have the user redirected
to the home page after submitting their new restaurant.
To do this we change our mutation to call history.push('/') after submitting
the API request.
We also add const history = useHistory() to use the history object from
react-router
Now, if you click on + Restaurant, type in details for a restaurant and click
the submit you will redirect to the home page and see your new restaurant
populated
