Common Setup
Reading
Common Setup
The tools in this section are required to be setup for any of the units in the program. These will be setup on your first day of class.
Slack
Slack will be our main form of communication. You will communicate with your instructors and SDG staff via Slack. You will get notifications of homework, links to resources, and be able to ask for help from peers and staff via Slack.
Download it to you computer; if you have a smart phone, I highly recommend installing the app.
Installation
Open your browser and download the desktop client for your platform.
Open your phone's application store and install the mobile application and sign in at least once.
Setup
You should have received an invitation to several Slack Teams
SDG maintains two main Slack Teams:
sdg-sais for students and alumni onlysuncoast-devsis a general Tampa Bay community team that includes over 1,300 members.
Github
Your github account is where you will be storing all of the work you do in these lessons and assignments. It will become part of your portfolio or work and document your journey of learning.
It is also how you will be tracking your assignments and turning in your homework.
Creating a github account
Start by following the Sign Up link on
github's home page.
Choosing a username - We recommend using a version of your given name. This
would be a version of the name you would put at the top of the resume you'd send
a prospective employer. You might be tempted to select a username like
kewldev98 but remember that a hiring manager WILL seek out your github
page and you want it to have a professional feel.
Uploading a profile photo
Use a good headshot photo - Use the best photo you have of you that shows your face. We recommend this because you want other developers, hiring managers, and companies to start recognizing you. Use your best photo. If you need a professional photo let us know and we can help.
Setup Your GitHub Token
THIS IS A CRITICAL STEP
To setup hub we will need an API token from GitHub.
Follow the
Creating a personal access token
guide to generate a new token. Give your token a helpful name such as "Token for
using my laptop". Select the repo checkbox before creating the token.
Copy the token you create.
We'll use this the first time we have to login to github
NOTE: This is the ONLY time this token will be displayed. To ensure its safety copy it to a secure location such as a password manager.
Nexus
We use nexus as our student information site. You will see your attendance record, homework assignments, lecture videos, as well as homework completion status.
To sign up, visit, https://nexus.suncoast.io and connect with your github login.
You will also see instructions to connect Slack with Nexus. If you choose to
you will receive notifications when homework is assigned as well as when your
assignments have been checked by your instructors.
Command Line
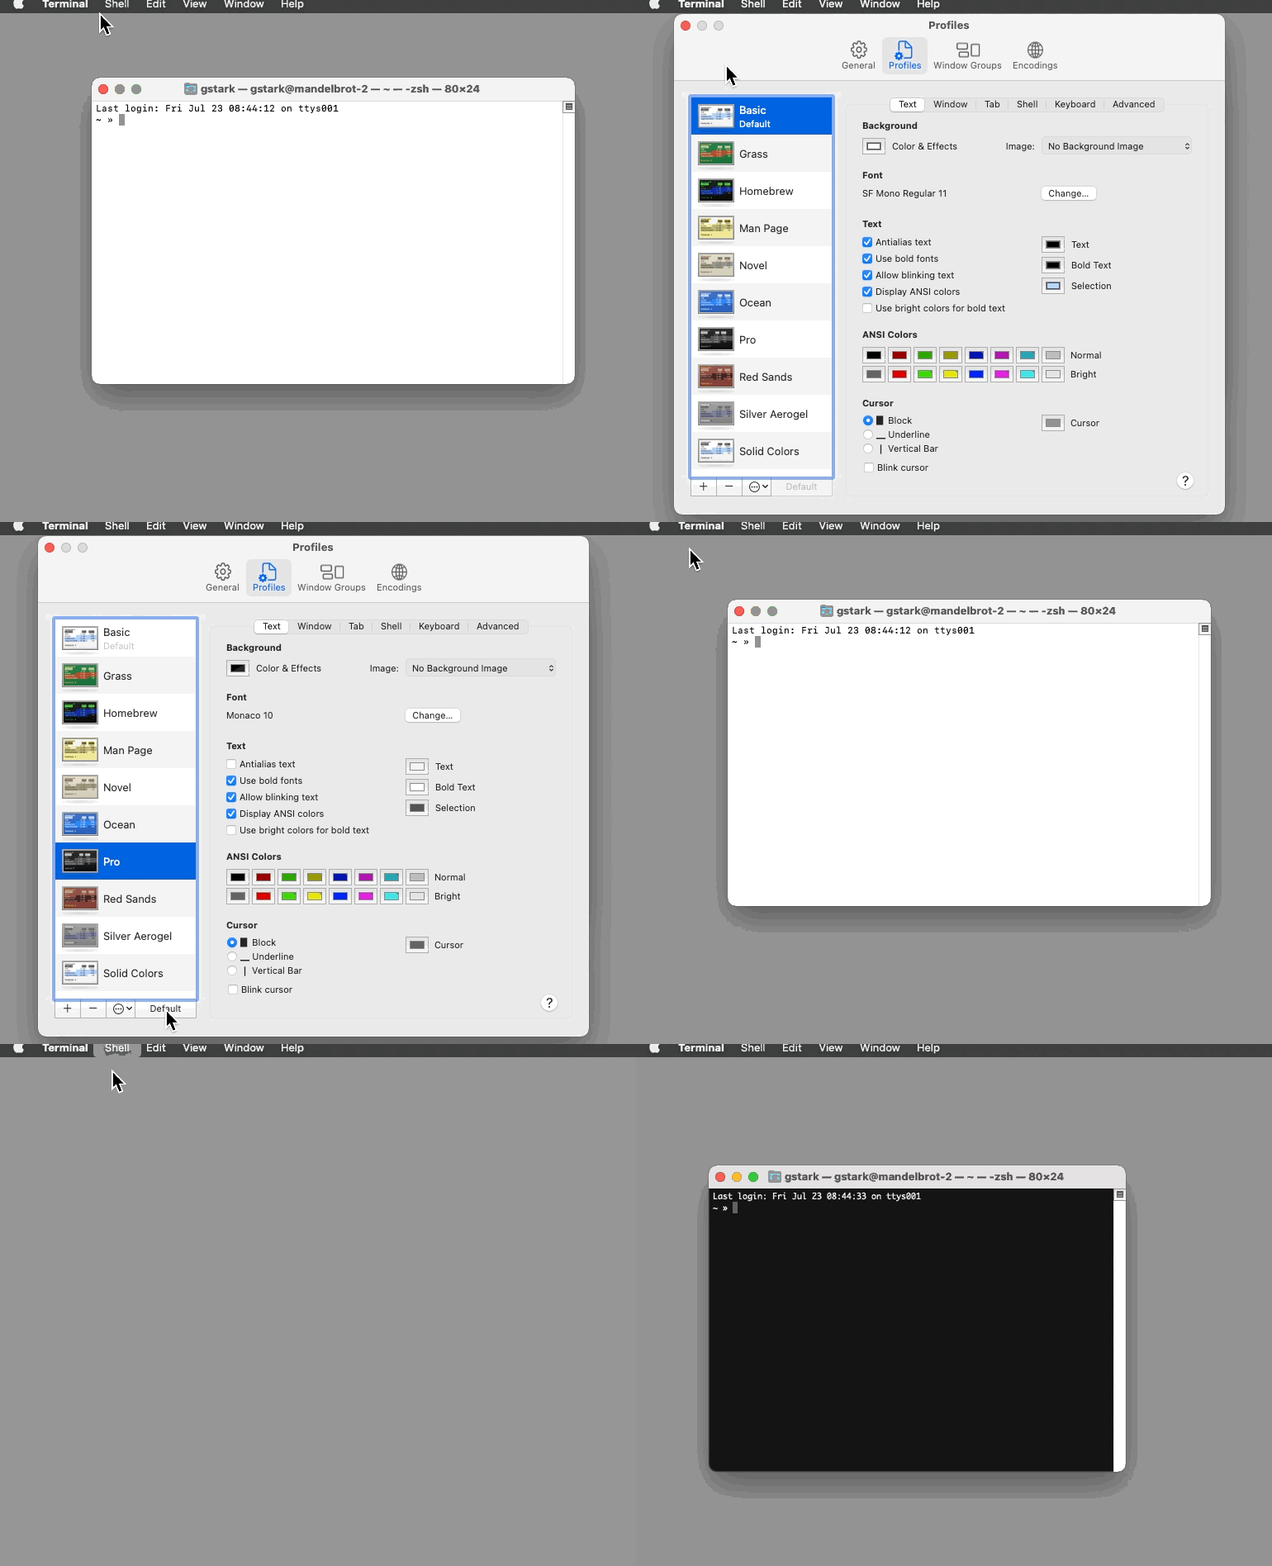
If your Mac is setup for Light Mode then the default color scheme for
Terminal is black text on a white background. This can be difficult to use for
long periods of time. If your Mac is setup for Dark Mode then the default
color scheme for Terminal is light text on a grey background.
If you are using Light Mode, consider changing your default profile to Pro
which will give you light text on a dark background. Your instructors, and your
eyes, will thank you.
These are our recommended profiles for Terminal:
- Pro
- Homebrew
- TheOne
To change your default profile, start Terminal and select Preferences from
the Terminal menu. Click on Profiles then on Pro (or any other profile you
want) and then click the Default button.

NOTE: if you choose a profile that is bright and colorful, but difficult for your instructor or fellow classmates to read, you will be making it more challenging to receive assistance.
Code Folder
During this course we are going to be creating many projects. Each of these will have their own directory. Thus we should attempt to organize these in some manner.
Choosing a place to keep your projects.
We feel there are a few choices on where to keep your projects
- In a folder named
sdgorcodeorprojectsin your home directory. Your home directory is where your PowerShell or terminal will start from. This makes your code directory just a step away. - In a folder named
sdgorcodeorprojectsin yourDocumentsdirectory. This is one directory below your home folder so it is still nearby. - In a folder named
sdgorcodeorprojectson yourDesktop. This too is only one directory below your home folder so it is still nearby.
Skip to the section below matching your desired structure.
Creating a folder in your home directory.
Choose what you want to call this directory and use the following commands to create it.
NOTE: In this example I'm choosing to call my project directory
sdg
Creating a folder in your Documents directory.
Choose what you want to call this directory and use the following commands to create it.
NOTE: In this example I'm choosing to call my project directory
sdg
Creating a folder in your Desktop directory.
Choose what you want to call this directory and use the following commands to create it.
NOTE: In this example I'm choosing to call my project directory
sdg
Tool Installation
Homebrew
Homebrew is a tool for installing other programs and tools. We will use it to install many of the development tools we need during this program.
Pre Setup
Open a Terminal and run:
This will install the Apple developer tools we need for many of the steps that follow.
Installation
Open a Terminal and run:
When this command runs it may ask for a password. This is the same password you use to login to your Mac, or unlock the screen.
NOTE: When you type your password it won't output anything, you'll be typing without any feedback. If you get the password wrong the installation process will let you know and you can try again.
Follow up
Node
Node is a runtime for JavaScript. This means that with node, we can run JavaScript on our machines without having to be in a browser.
When working with HTML, CSS, and JavaScript we will find many of the tools require, or are written in, JavaScript with node.
Installation
SDG helper tools
Install this tool which includes some helpful add-on functionality we use at SDG.
Visual Studio Code
Developers debate about which code editing environment is better. Here at SDG, we require using Visual Studio Code. VS Code is a extendable lightweight editor that is still full featured and supports useful plugins.
Installation
Visit https://code.visualstudio.com/ and download the installer.
- This will download a
ZIPfile. - Find the download (did you download it to your desktop or your download folder?)
- Double click the zip file
- This will make a new file "Visual Studio Code"
- IMPORTANT STEP -- Drag this file to your
Applicationsfolder (it should be right there in the finder "sidebar") - Open your
Applicationsfolder and double click the Visual Studio to launch it the first time
Adding command line option
Launch VS Code. Once launched use the key combination COMMAND + SHIFT + P.
This will launch a search window. Type install code and then click on the
option titled Shell Command: Install code command in PATH
Enable Extensions
VS Code has a large number of optional extensions that increase the capabilities of the editor. We have chosen a few that we feel improve the workflow during the course. We recommend running the following commands to install these extensions into your Visual Studio Code.
General Extensions:
In any terminal (and any directory) run the following:
To read about these extensions:
C#/.NET Extensions:
In any terminal (and any directory) run the following:
To read about these extensions:
Front End Extensions:
In any terminal (and any directory) run the following:
To read about these extensions:
Configure Visual Studio Code
In VS Code go to the "View" menu and select the menu item "Command Pallete".
Then type Open Settings JSON and select option that does NOT mention
"Default" or "Workspace"
This will open an editor window.
If this file contains {} (it may be on two lines) you may proceed with the
next step. If it contains anything else STOP and ask for assistance.
Replace the contents of this file with:
Then save the file and close the tab.
Git
Git is a distributed source control system. This allows us to easily work and collaborate, on many different projects.
Git is how we will be managing our files and sharing code with each other. Git is a complex tool and it will seem rough at first. However, with practice, you will become familiar with the commands and options.
Pre Installation
First, make sure you have a GitHub account.
Installation
Default branch name
When working in git as a source control resource we work in branches of
code. Branches are a series of changes to code for a particular purpose. The
default branch for a new git project has been master. SDG believes
master-slave is an oppressive metaphor and we empathize with those hurt by the
use of that term.
Git allows for a mechanism to change the default name of this branch. We suggest
changing this to something like trunk (to continue to the tree metaphor) or
main (since the first two letters match and help with auto-complete if you are
used to typing master)
Read more from the IETF, the git project, and from the software conservatory
Tell Git your Name
Every line of code you save with git will be attributed to you. git will
need to know the name to associate with the code. You should use your real
name here, not a pseudonym or a 1337 haxor name.
NOTE: In the following command, instead of
"Replace This Example With Your Full Name"use your full name, e.g., "Jane Q Public" or "John Q Public".
Example:
Example:
or
Tell Git your E-Mail Address
-- IMPORTANT NOTE -- STOP AND READ --
In the following command, instead of
email-address-you-used-at-github@example.comuse the same email address you gave to GitHub. Github uses this to make sure it can generate this awesome "activity" chart for you.
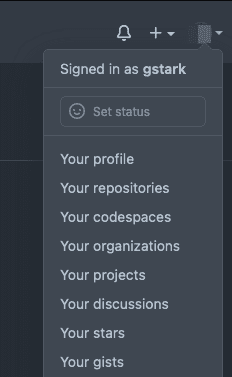
To find the email address you used at github, go to this menu and choose "Your Profile"
Once you do, you'll see your profile page that includes the email address you used for registration on github. (highlighted in RED)
Command to run WITH YOUR PERSONAL EMAIL ADDRESS:
Examples:
Tell Git your Github username
Replace GITHUBNAME here with your github LOGIN / USER name. You can get this from the Github API by clicking on your user icon in the upper right hand corner. It will say "Signed in as GITHUBUSERNAME"
Ensure git uses VS Code for it's editor
Tell Git + Hub to use HTTPS
We need to set up Git and GitHub to use the https protocol. Enter the
following in your shell (Powershell):
hub
Hub is a command line helper for github. It allows for easy github manipulation from our terminal.
From your terminal, run the following commands (current directory does not matter):
Installation
Post Installation
Start a new Powershell and enter the command:
This will ask for your github.com username, supply your username or email
address. Enter your github token as your password. NOTE You will NOT see
your password displayed back to you.
hub outputs a lot of text. If you get a "wall of text" similar to the output
below, then you have setup hub correctly. Otherwise you may see an error
message.


